Our Parlor is Done!!
I have decided to resurrect our defunct blog in order to make an official post and keep record of the finally completed resto-vation of our Parlor! This is for those of you who were not satisfied by the more simple 'before and after' pictures of the Facebook post, and want details on the nitty-gritty of a complete remodel.
For those of you not in the 'know', this was the first room that I started on when we moved into our house 8 years ago. Three kids, a lot of steep learning curves, and numerous 'more pressing' projects later, and it is finally finished!
Lets start with a few before pictures. I apologize for the clutter, but these were taken literally the day we moved into the house.
 |
| View from the Living Room |
 |
| Facing East |
 |
| View from doorway |
 |
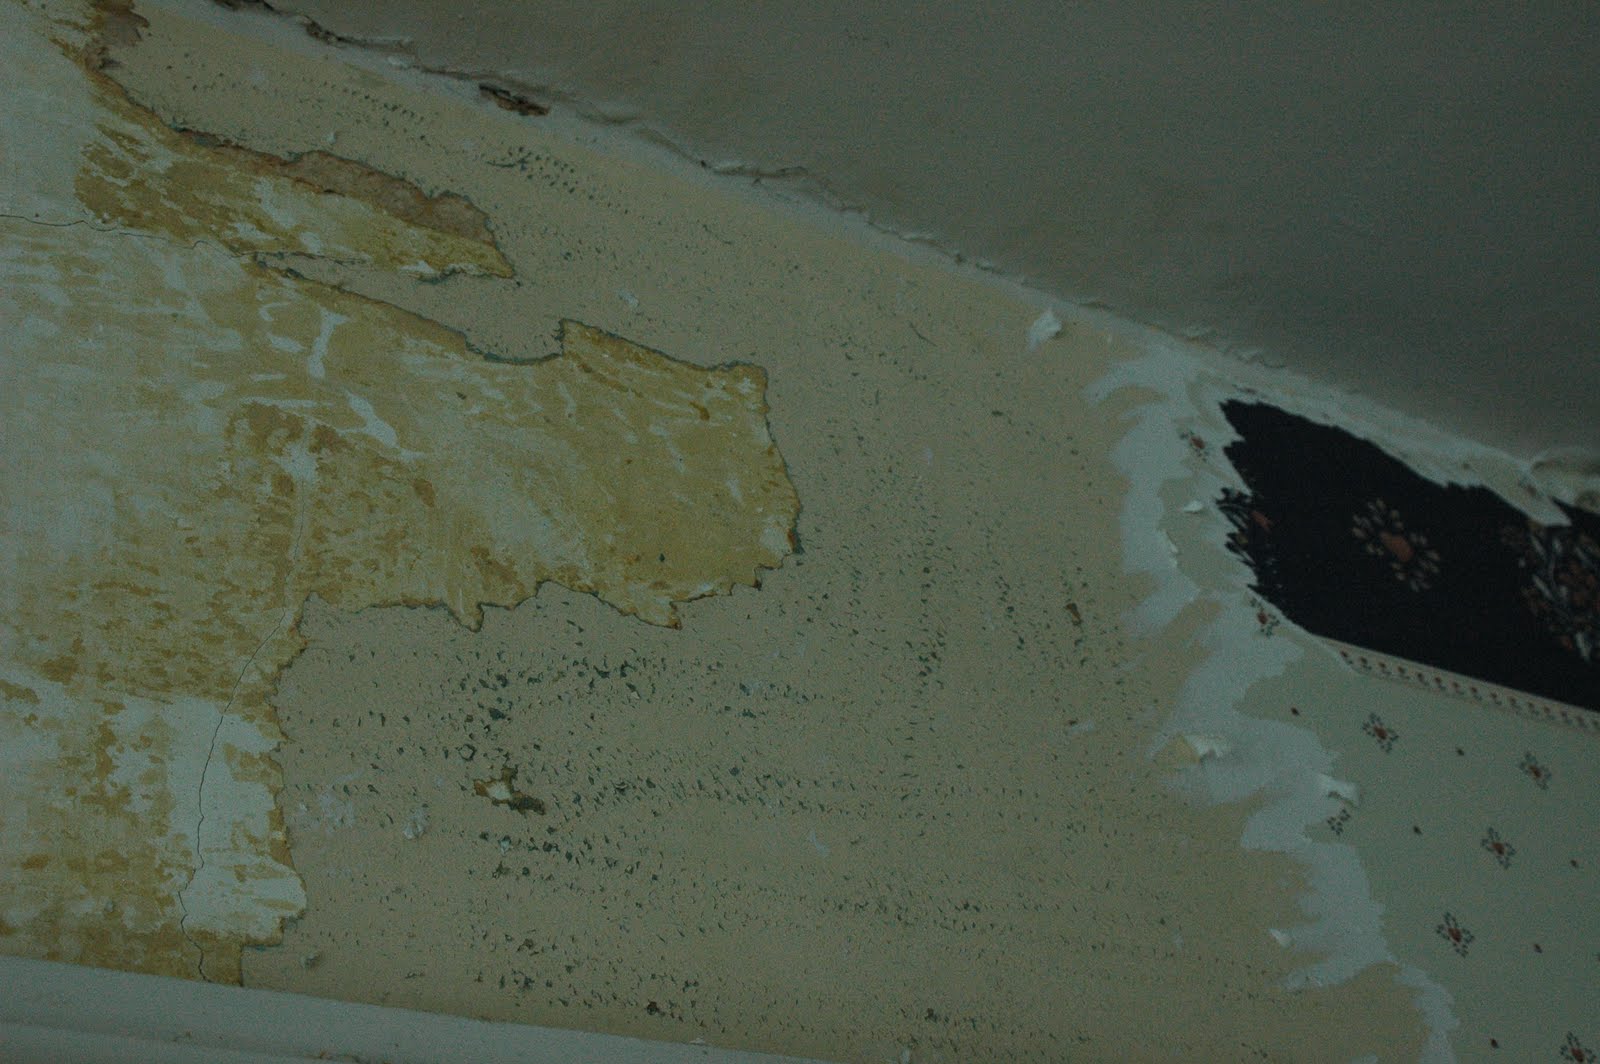
| Ceiling (notice cracks in plaster behind wallpaper) |
 |
| Looking out towards Living Room |
The first order of business was to strip the wallpaper. Not to hard, right? One would think not, except one thing I've come to learn about our previous owner is that his philosophy of home maintenance was "Why fix what you can cover up?" Wallpaper not looking so good? Throw up another layer!

 |
| It was kinda fun discovering all the old patters underneath. |


The biggest problem with this multi-layer wallpaper was that there was often a layer of paint between the papers. For those of you who have never had to strip wall-paper, it is done by adding moisture to the glue, which loosens it, allowing you to use a scraper to peel off the paper. Paint prevented the steam/water/anything from penetrating.
 |
| To give you an idea of how much more difficult this made things, that little square of stripped wallpaper on the ceiling took me about an hour and a half. Times that by the entire ceiling. And don't forget that you're working over your head, which is always terrible. |
 |
| Ooh? What is this? |
 | |
| After a bit of research, I found out I had discovered the original 'gravity vent'! |
 |
| This is to give you some idea of the process on the walls...scrape the top layer, score the paint heavily, and then spend a ton of time trying to get the paint/wallpaper underneath off. Unfortunately for me there were more layers of paint/wallpaper on the ceiling. |
The room did not have any light switches or chandeliers, which is odd given the awesome plaster medallion. While stripping wallpaper, I did discover where the original switch was located. As a cool note, I've discovered since that the house was originally piped for gas fixtures!
 |
Next project was to clean the walls with TSP to get all the glue off.

 |
| You can see the difference! |
Next, it is time to do some plaster repair. I used Big Wally's Plaster Magic, which seven years later is still doing a great job! It is a bit of a process, and can be messy, but it works!

 |
| A previous, and very large area of plaster repair. Note the air return vent in the bottom corner...I'll reference that at the end. |
 |
| Where part of the ceiling had detached and sagged. I ended up having to rip this part out. |
 |
| A chunk of plaster from an exterior wall to show how thick it is. Great insulation and sound dampening. This also goes to show why I will always fix instead of rip out. One room would fill a dumpster several times over and weighs an obscene amount. And it is dusty...so dusty. It may be more meticulous, but definitely easier to repair. |

 |
| There's that gravity vent, all nice and exposed! |
Since plaster repair is slow work (you have to wait 24 hrs. for the adhesive to dry, and you can only do a 5 or 8 sq. ft. segment at a time), I removed the doors and started stripping paint. If you love slow, tedious work, you should try stripping paint. You will find it wonderfully meditative.
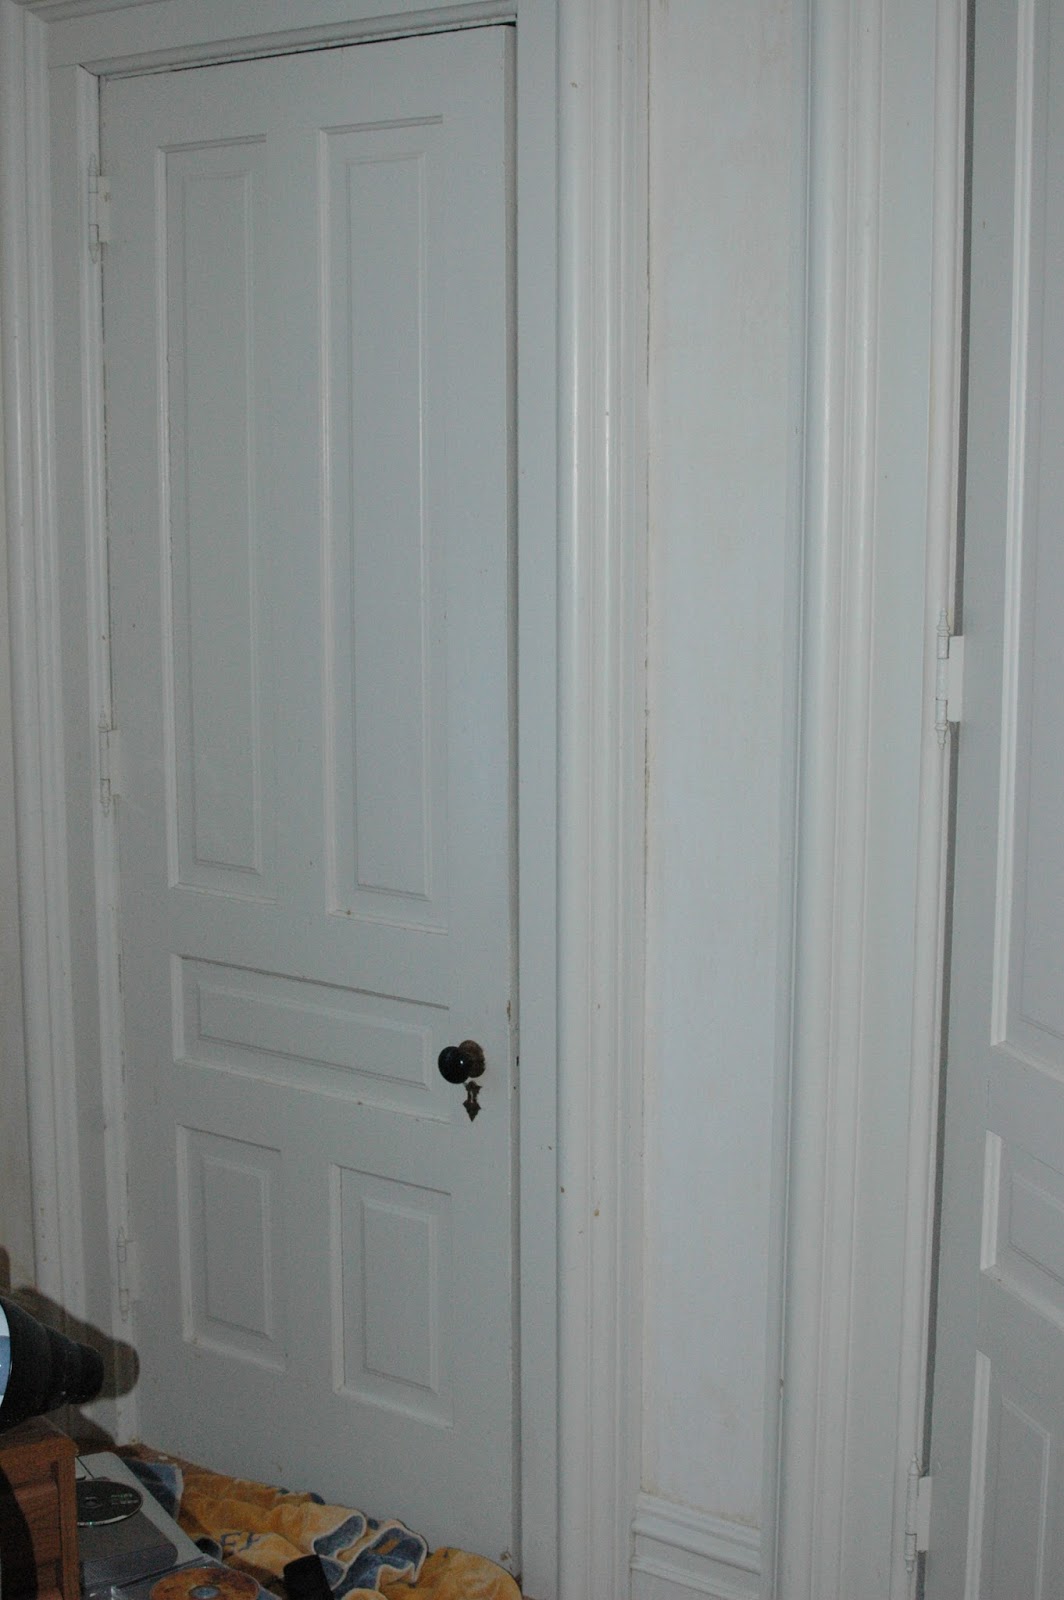 |
| This door used to be an exterior entrance, now it opens up to the back of a closet in the front door entryway. Weird...I know. |
 |
| 9 ft. French doors between parlor and living room. |
 |
| Remember what I said about my previous owners philosophy? This applied to paint too! Paint looking bad? Slap another coat on haphazardly! And don't you dare bother with any of that boring prep work! |

 |
| Paint stripped! Just need to clean off the old finish! |
Once the plaster was repaired, it was time to strip the paint off the trim. You know how I said it was a tedious chore? I estimated that from start to finish (stripping to entirely refinished), each individual window trim, door trim, door, baseboard) took about 55 hours. There are 3 windows, 3 doors, 2 door frames, and the baseboard. You do the math.

 |
| Hooray fixed plaster! |
Our previous owner (yeah...in case you're not picking up on it...I'm not overly fond of the guy) told us that all the trim in the house was Walnut (a very nice wood). It was not. It is heart pine. This realization was very depressing. But, I was pleased to discover that it had originally had a cool two-tone stain job, which I decided to emulate in the refinish process!
 |
| Stripped window trim showing original stain |
And all clean and ready for a new finish!
 |


 |
| When I said 'back' of a closet, I wasn't kidding! |

 |
| Yeah. Definitely NOT Walnut. :( |
With the trim done it was time to pull up the carpet and work on refinishing the floors! The Oak floors are not original, but were likely installed in the 1910s-20s based on the manufacturer's stamp on the bottom of the boards (visible in some spots in the basement). Because they had spent most of their life under carpet, apart from some staining they were in pretty good shape!
I did give it a light sanding with a belt sander (and learned from that experience, after burning up two DeWalt belt sanders, to never trust a product on name brand alone. Always read reviews on the specific item!)


One of the other projects I had going on through all this was the medallion. It, too, had been caked in many layers of white paint. While I don't know if this one ever was, it wasn't uncommon to have had these painted beautiful colors to match the room's decor. This is what I wanted to do, so it was time to get rid of all the paint!


There was something about either the paint stripper or the TSP I used to rinse it off that reacted oddly with the medallion and made it grow fur. It had me panicked for a bit, but I ended up just using a dry brush to sweep it off and nothing was worse for wear because of it!


And while we're talking about the medallion, the wiring that ran to it to that point (and probably partially why it was boarded off in the first place) was the knob and tube that would have been installed sometime in the teens or early twenties. So, I took this opportunity to rewire the medallion, as well as the rest of the parlor and the basement work room below it.
Most jobs that I had to do (stripping wallpaper, paint...I'm looking at you), were pretty awful and I did not enjoy them in the least, but I enjoyed the end result enough to make it worth it. Wiring was something else. There was something tremendously satisfying in ripping out the rats nest of 100 years of tangled, messy wiring and setting new, neat and tidy runs.
Now, while the wiring in the parlor was not too difficult because I could access almost all of it through the basement, the wiring to the medallion was another matter. I had to go into Aundrea's room and rip up the floor (several layers of it, in fact. From top to bottom: Carpet, linoleum, original wood floor, original wood sub-floor.). It was a long, hard weekend.


 |
| Look at that modern wire hanging from the center! |
While I will wait tell the end to show you the finished product, I will tell you now how I finished it. I've known since almost day one that I was going to use Bradbury and Bradbury's Dresser II Roomset wallpaper on this room. Samples in hand, I went to Menards to get matching paint so the medallion would match the wallpaper. I have to give a shout out to them. The guy in the paint department spent two hours with me matching 18 different colors, and he was super cool about it...even though I was only buying sample sizes at two bucks a pop (which was still about 100x more per color than I needed to paint the medallion).
So, scaffolding set up, and tiny paintbrushes in hand, I painted. And I painted. It required two coats of any color, which was a pain when you were painting such small, delicate detail. And the worst was the handful of times that I stood back and realized that the colors I had put next to each other didn't work at all and it had to be redone. But while it was a lot of work (everything in this room was...hence why it took 8 years!), I am enamored with how it turned out.
So what was I going to hang from that beautiful medallion? Not just any chandelier of course! I scored a sweet 1874 Bradley and Hubbard Oil Lamp Chandelier #614, from the height of the Aesthetic Movement, for only $50 on eBay.
Obviously it isn't perfect. The crown (very top) is broken and missing some bits, and it only came with one font holder, so I had to find two, more common, Bradley and Hubbard font holders which aren't nearly as pretty, but overall I'm delighted with it! It was also missing nearly the entirety of its original finish, so I had to refinish it.
Pictures are as I purchased it.


And while we're on the subject of refinishing some miscellaneous pieces...here are the vents I got (also off of eBay) to cover the ceiling gravity vent, and also the return air vent. Again...layers and layers and layers of paint.

And the original hinges that needed some work as well.


A quick (but relevant) story. Our first summer in the house, at the height of the recession, a high end milling place in Detroit closed and auctioned off their stock. I bought...a lot (I believe i calculated it to be almost 6,000 linear feet). Almost all of it was either Cherry or African Mahogany, and it is every type of trim imaginable. Crown, base, shoe, panel, corner, chair, bolection (I don't even know what that is), and more. With all of this, I could really have some fun with the crown moulding.
I ended up using, from top to bottom: 4" mahogany baseboard (on ceiling), 7" Mahogany Crown Moulding, 3"x3" Mahogany bolection molding, same 4" mahogany baseboard on bottom, with cherry dental moulding under the bolection and on top of the baseboard.
 |
| Bringing it home from the auction! |
 |
| Neatly and safely stored in the garage. |
Now...I should note at this point that between refinishing the trim, and installing the crown moulding there was a several year gap. Part of this was due to other projects that were more immediate in their necessity.
A bigger part of it was because I was building bookshelves. Before this the only furniture I had ever made was a pretty simple coffee table. There was a pretty huge learning curve, and it took me a looonnngg time and a lot of trial and error to build them. A cool tidbit about them: They were built almost exclusively (with the exception of a few bits of burl veneer that I bought) from three walnut trees harvested from our property and cut up by a friend of ours from church (I'm still eternally grateful Barb and Andy Doezema!)
It was also during this break that I became a lot less diligent and taking pictures of the progress I was making...so it goes from what you've seen thus far to pretty much finished. So I'll leave out the photos that show everything finished and in place except for the wallpaper, and go right to the fully finished project (which you probably already saw on Facebook).
It should also be noted before continuing that the one and only thing that I did not do myself was installing the wallpaper. Bradbury and Bradbury was not something I wanted to learn on.
Without further ado....
Ladies and gentlemen....
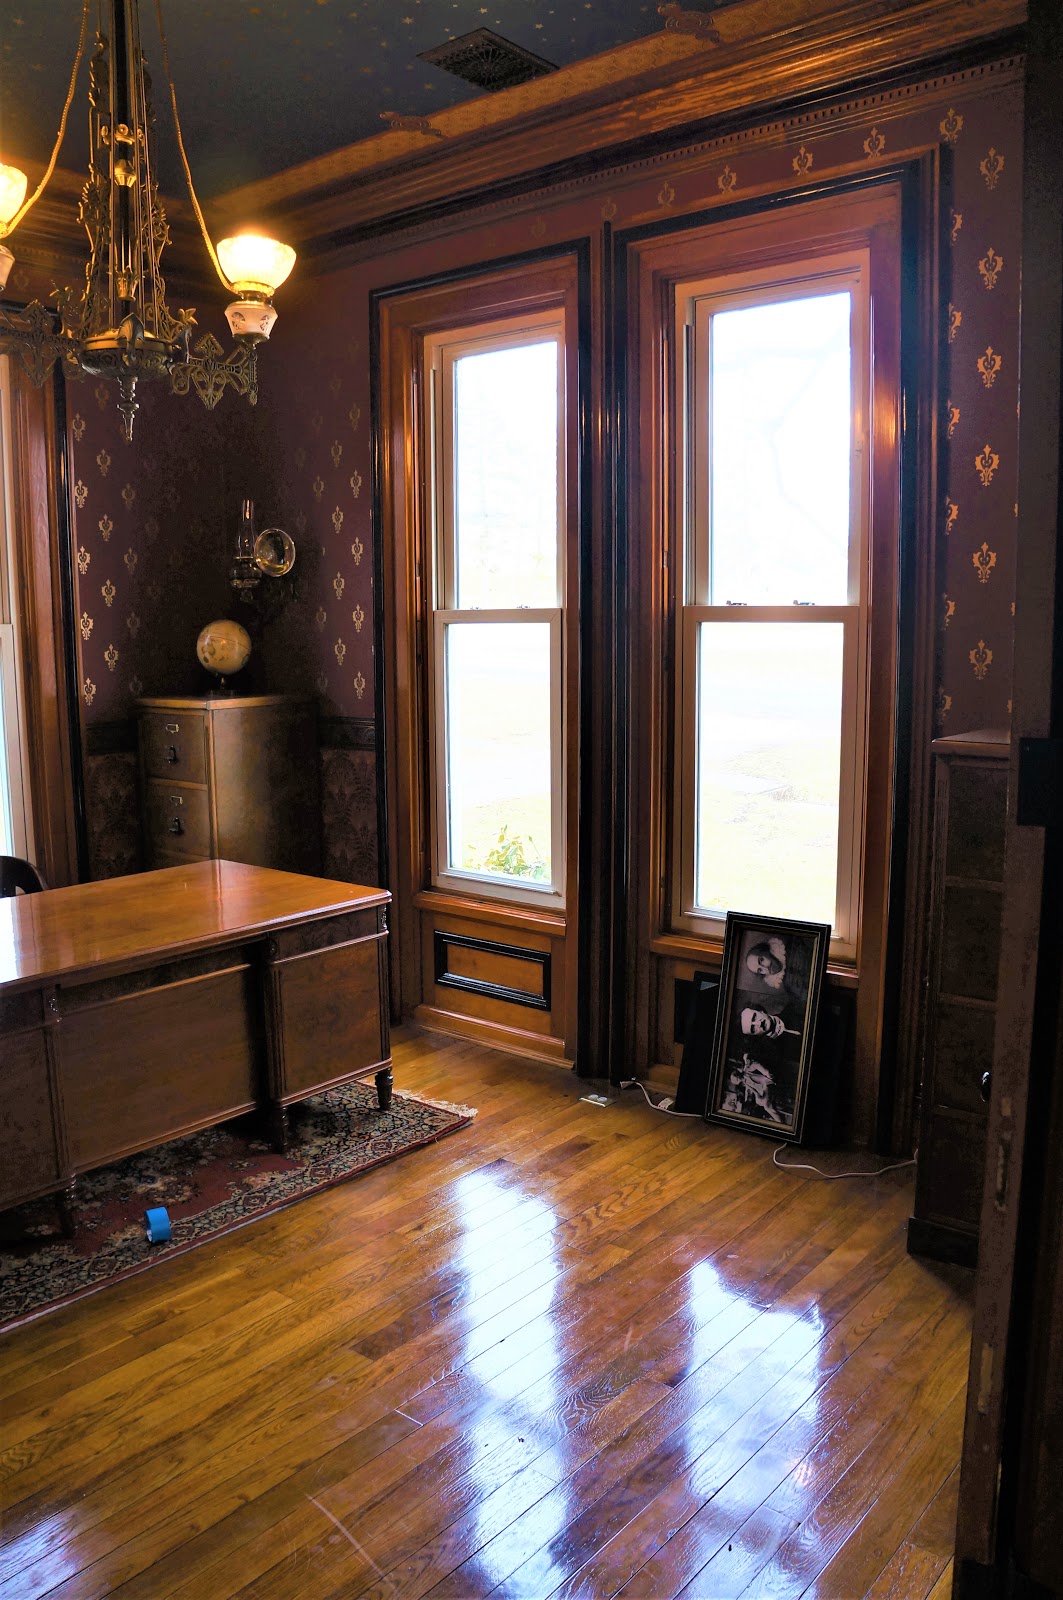
.....Our parlor!
 |
| Looking towards the living room. |
 |
| From the living room looking in. |

 |
 |
| The painted medallion |
 | |||
| Decided to have some fun with the light switch! |
 |
| I installed five functioning oil lamp wall sconces so that in the case of a power outage, we could all gather in the parlor and still read books or play games. Three of the style (above) are on the wall. They are Bradley & Hubbard cast iron sconces that I bought and refinished. The two below are mounted to the bookshelves. They are also Bradley & Hubbard, but are a much nicer cast brass sconce, and also utilize the same peg font (as opposed to the basket font holder above) as the chandelier. |

 |
| The return air vent. If you venture all the way back up to the section on plaster repair, the second picture with the big gray 'old' repair, you can see what was originally there (bottom right corner). If you don't want to, suffice to say that the wood surround was not originally there. |

 |
| And finally, the Bookshelves, of which I am unabashedly, obscenely proud! |


Comments